LDAP filters are used to specify criteria for directory search. However, sometimes it is quite difficult to construct LDAP filters because of their complicated syntax and the diversity of components. LDAP Administrator offers the LDAP Filter Builder tool to provide for a more efficient creation of filters.
LDAP Filter Builder not only allows building new LDAP filters, but also makes it easier to analyze and edit the existing ones thanks to a convenient new mode of representation and lots of other nice features like Undo/Redo, Drag 'n' Drop, Intellisense, Clipboard and more.
LDAP Filter Builder is accessible via the  button that usually can be found inside an edit box for entering an LDAP filter.
 Editing Filters
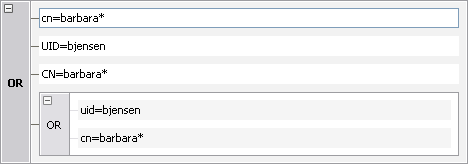
If you'd like to specify a compound filter, for example (|(cn=barbara*)(uid=bjensen)), you can simply type it into an edit box inside the control

then press Enter, whereupon the control will represent your filter in an expanded view:

You can also start typing a filter in like e.g. (cn=barbara*) and then right-click the item to open its context menu and choose  Make Filter Group or select the item and press Ctrl+M. This will result in the control creating a filter group for you to eventually type (uid=bjensen).
In case you want to add another simple or compound filter to an existing one, select a target compound filter and:
Press Ins or click
 Add Filter Item inside the filter's context menu to add a simple filter, for example (cn=barbara*).
Press Alt+Ins or click
 Add Filter Group inside the filter's context menu to add a compound filter, for example (|(cn=barbara*)(uid=bjensen)).
If you need to edit a compound filter as text, you can collapse a filter group, which represents the filter to be edited, by clicking  and then clicking on the text or pressing Enter.

Operations on FiltersChanging Logical Operations.
To change a filter's logical operation, choose  Change Operation from a compound filter's context menu or press either Ctrl+O for an OR operation or Ctrl+A for an AND operation.
Negating Filter Parts. To negate a filter, select it in the control and click Negate in the filter's context menu or press Ctrl+N. To cancel negation, repeat the operation.
Removing Filter Parts.
To delete a simple filter, select it and press Del or choose  Remove Item from its context menu.
To delete a compound filter, select it or one of its simple filters and press Alt+Del or choose Remove Group from its context menu.
Remove Item from its context menu.
To delete a compound filter, select it or one of its simple filters and press Alt+Del or choose Remove Group from its context menu.
Filter Validation. To check whether the filter that you've specified is valid, press the Check dialog button. In the event that the filter being edited is incorrect, the control will notify you with a balloon containing detailed information about an error and about the location where it has occurred, placing the caret right to that location. If you ignore the error, the invalid filter path will be marked in red.
Filter Normalization. LDAP Filter Builder also allows normalizing LDAP filters, which can be helpful when working with complicated and software-generated LDAP filters. Filter normalization involves removing duplicated and redundant filter parts, making all attribute types lowercased and merging eligible filter parts. For example, here is what a non-normalized filter looks like:
Upon normalization, it will become like this:

To normalize a compound filter, select it in the control and press Ctrl+R or choose Normalize from its context menu.
Other Operations. In order to make editing LDAP filters a more efficient process, LDAP Filter Builder provides for some advanced features like Clipboard, Drag-and-Drop, Undo/Redo and Intellisense.
Favorite Filters
LDAP Filter Builder allows storing LDAP filters for further reuse via the Favorite Filters section. When this dialog is launched for the first time, the section will be hidden. To toggle the section, use the  button located at the bottom of the Filter Builder control.
To save an LDAP filter to Favorites:
Specify an LDAP filter you'd like to save.
Press the Save As button inside the Favorite Filters section.
Type a name for the filter and click Save.
With the LDAP filter already saved, its newly given name will appear in the filter's drop-down list for you to be able to choose it at any time.
To use an LDAP filter previously saved to Favorites:
Choose a filter by name from the drop-down list located in the Favorite Filters section. If you can't find the desired LDAP filter in the list, choose the Browse item to locate the target filter file in other folders.
To delete an LDAP filter from Favorites:
Select a target filter in the drop-down list.
Press the Delete button inside the Favorite Filters section.
Coloring SchemeLDAP Filter Builder highlights different elements of an LDAP filter with different colors so you can easily distinguish between them when editing. You can set your own color scheme with the help of the Edit Coloring Scheme dialog. To launch the dialog, press the Colors... button inside the Filter Builder Dialog.
To select an element whose color you want to edit, select it in the Elements list or simply click it once with the mouse in the Preview section. To change an element's color, use the Text color/Background color buttons in the Color section.
To reset your color scheme to the one provided by default, press the Reset Color Scheme button in the Color section.
After you have edited the color scheme, the changes will be applied to all the controls responsible for editing filters in LDAP Administrator.
Control Shortcuts
| Operation | Shortcut |
|---|---|
| Add Filter Item
| Insert |
| Add Filter Group
| Alt+Insert |
| Make Filter Group
| Ctrl+M |
| Remove Simple Filter
| Delete |
| Remove Compound Filter
| Alt+Delete |
| Change logical operation to AND | Ctrl+A |
| Change logical operation to OR | Ctrl+O |
| Negate Filter | Ctrl+N |
| Normalize Filter | Ctrl+R |
 Invoke Intellisense Invoke Intellisense
| Ctrl+Space |
 Cut Cut
| Ctrl+X or Shift+Delete |
 Copy Copy
| Ctrl+C or Ctrl+Insert |
 Paste Paste
| Ctrl+V or Shift+Insert |
 Undo Undo
| Ctrl+Z or Alt+Back |
 Redo Redo
| Ctrl+Y or Shift+Back |